Beware Beware
PreferredByPete.com Enthusiast
VS Weather Forecaster (setup Instructions)
C/P
This setup is almost as easy as the old standalone days... It is definitely the easiest of any other I have tried.
This is assuming your receiver is already hooked up to tv and satellite dish and ready to go.
1. Flash receiver via USB with your specific receiver sofware, in this case, Ultra-Lite, PFTAUSW-100222UL
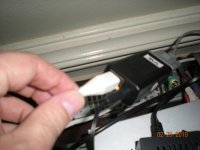
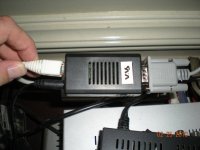
2. remove WF from box, attach serial cable to serial side of main body, then connect other side to serial on receiver.
3. Connect your WF to internet via Ethernet RJ45 cable.
4. Attach Power cable to main body, then plug into outlet.
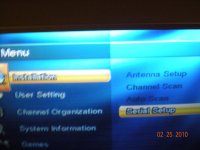
5. Click menu on receiver remote.
6. For static IP:
Go to installation => Serial Setup => Network Setup => Network setting => put your IP
For non-static IP
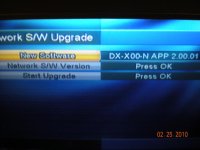
Go to installation => Serial Setup => Network Setup => Network S/W upgrade => Start Upgrade. Software for WF is upgraded automatically.
Once upgrade is done, exit from menu system, it is now functional!
Files will be released Shortly!!!!!
C/P
This setup is almost as easy as the old standalone days... It is definitely the easiest of any other I have tried.
This is assuming your receiver is already hooked up to tv and satellite dish and ready to go.
1. Flash receiver via USB with your specific receiver sofware, in this case, Ultra-Lite, PFTAUSW-100222UL
2. remove WF from box, attach serial cable to serial side of main body, then connect other side to serial on receiver.
3. Connect your WF to internet via Ethernet RJ45 cable.
4. Attach Power cable to main body, then plug into outlet.
5. Click menu on receiver remote.
6. For static IP:
Go to installation => Serial Setup => Network Setup => Network setting => put your IP
For non-static IP
Go to installation => Serial Setup => Network Setup => Network S/W upgrade => Start Upgrade. Software for WF is upgraded automatically.
Once upgrade is done, exit from menu system, it is now functional!
Files will be released Shortly!!!!!