BROWNNOSE
BOOTLICKER
Special Thanks To
A friend to "PBP"
Tech007
C/P
There is a lot of confusion going on here since the New Bin was released. I am going to try to explain how to perform this update in simple terms and steps.
The New Bin 515 Upgrades the I-Hub Firmware Via the USB port, no longer uses the Wiznet. But before loading Bin 515 the I-hub needs to be loaded with I-Hub V2.2
Steps taken in this order.
Uploading latest I-Hub rom before the New Receiver Bins commencing with Bin 422:
1. Download the following files Wiznet and then the latest I-HUB file V2.2
https://preferredbypete.com/sonicview-discussions-164/
2. Launch the WIZNET Program (WIZ1x0_105SR_install). This will lead you through the installation of the this program. Then go to Start>Programs>WizNet>WIZ1x0_105SR Config tool>WIZ1x0SR_105SR_CFG.exe
3. Make sure the tab is on Network, select DHCP, then click on Search on the bottom. This will pull up IP adress and other information.
4. Copy and paste the bin file from the zipped folder (Ihub v2.2bin) to your desktop or any folder you want to paste it to.
5. Select upload from the WIZnet and select Ihub_v2.2.bin file, then click on open. Wait for the process to complete.
6.Click Search again and you should see the Ver 2.2 on the top Left, the Boardlist filled in, Ips Filled in and Port #1920
7. Reboot the receiver with the Rear Switch
8. Click on CH 101 make certain you still have Picture
9. Leave the I-Hub connected.
Updating the Receiver File:
10. Download the newest Receiver File commencing with Bin 515.
https://preferredbypete.com/8000-hd-files-171/
11. Place USB stick in Drive Click on Menu>PVR>USB Drives. Select the latest file starting with Bin 515 and click on OK on the remote. The update will start
12. Let the Process of loading continue. when it asks to reboot, Click Yes
13. The Message Updating Image should appear, do not interrupt it.
14. Once loading process is complete and it appears things have stopped, wait 5 minutes more and Reboot with Rear Switch.
15. If you have not set up the receiver yet Set up your satellites and Scan when you have proper Sat Lock.
16. If pointing to 119W, Click on CH 101 picture must come in as it is a Free Channel.
17. If you have Picture on CH 101, click CH 122 and wait for Picture.
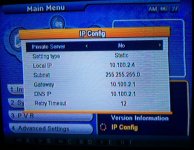
18. if after a few Minutes there is no Picture then go to Ip Config.
Checking Network Info on the receiver
19. Go to Menu, Ip Configuration
20. Make certain Private Server is : NO
21: Setting type on: DHCP (not like Picture) and the Ips are correct.

22. Exit
23.Click on CH 122 and wait for Picture
All should be functioning now.
I hope this provides a better understanding on how to perform the update.
If still no Picture after 5 minutes, please ask for help in the Forums Discussions Section pertaining to this Receiver.
B Hunter
A friend to "PBP"
Tech007
C/P
There is a lot of confusion going on here since the New Bin was released. I am going to try to explain how to perform this update in simple terms and steps.
The New Bin 515 Upgrades the I-Hub Firmware Via the USB port, no longer uses the Wiznet. But before loading Bin 515 the I-hub needs to be loaded with I-Hub V2.2
Steps taken in this order.
Uploading latest I-Hub rom before the New Receiver Bins commencing with Bin 422:
1. Download the following files Wiznet and then the latest I-HUB file V2.2
https://preferredbypete.com/sonicview-discussions-164/
2. Launch the WIZNET Program (WIZ1x0_105SR_install). This will lead you through the installation of the this program. Then go to Start>Programs>WizNet>WIZ1x0_105SR Config tool>WIZ1x0SR_105SR_CFG.exe
3. Make sure the tab is on Network, select DHCP, then click on Search on the bottom. This will pull up IP adress and other information.
4. Copy and paste the bin file from the zipped folder (Ihub v2.2bin) to your desktop or any folder you want to paste it to.
5. Select upload from the WIZnet and select Ihub_v2.2.bin file, then click on open. Wait for the process to complete.
6.Click Search again and you should see the Ver 2.2 on the top Left, the Boardlist filled in, Ips Filled in and Port #1920
7. Reboot the receiver with the Rear Switch
8. Click on CH 101 make certain you still have Picture
9. Leave the I-Hub connected.
Updating the Receiver File:
10. Download the newest Receiver File commencing with Bin 515.
https://preferredbypete.com/8000-hd-files-171/
11. Place USB stick in Drive Click on Menu>PVR>USB Drives. Select the latest file starting with Bin 515 and click on OK on the remote. The update will start
12. Let the Process of loading continue. when it asks to reboot, Click Yes
13. The Message Updating Image should appear, do not interrupt it.
14. Once loading process is complete and it appears things have stopped, wait 5 minutes more and Reboot with Rear Switch.
15. If you have not set up the receiver yet Set up your satellites and Scan when you have proper Sat Lock.
16. If pointing to 119W, Click on CH 101 picture must come in as it is a Free Channel.
17. If you have Picture on CH 101, click CH 122 and wait for Picture.
18. if after a few Minutes there is no Picture then go to Ip Config.
Checking Network Info on the receiver
19. Go to Menu, Ip Configuration
20. Make certain Private Server is : NO
21: Setting type on: DHCP (not like Picture) and the Ips are correct.

22. Exit
23.Click on CH 122 and wait for Picture
All should be functioning now.
I hope this provides a better understanding on how to perform the update.
If still no Picture after 5 minutes, please ask for help in the Forums Discussions Section pertaining to this Receiver.
B Hunter
Last edited by a moderator:
