ricklbert
Moderator
I HUB MANUAL
Connect the IHUB to the receiver by plugging it in directly to the serial port on the rear of the receiver.
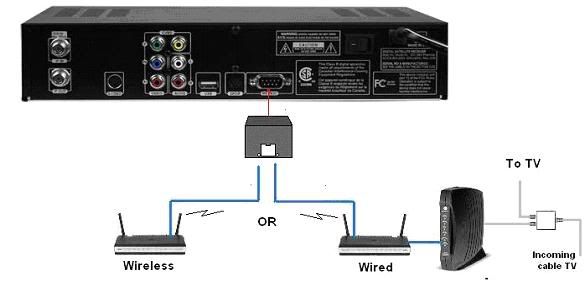
You can either connect the IHUB via the fixed wire to the router and the modem or you can connect a wireless router and change the mode of the router to support wireless reception to the receiver and use a short cable to connect to the IHUB as shown above. The lights on the IHUB should light up if the cable connection to the router is correct. These lights verify connection as well as data transmission.
Software
Download the appropriate software that corresponds to your receiver. You can’t use the device on other machines than the units the software is particularly designed for.
Unzip the file after downloading and copy the file to your USB stick. Remember to properly release the drive from your PC and Windows before unplugging the drive from the computer..
Open the menu and go to your PVR menu. Select the corresponding socket that you plug your USB drive into. The file should appear in the screen as shown below.
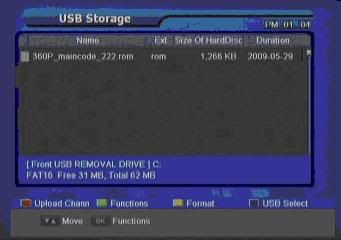
Push ok and allow the receiver to load the file. Don’t touch anything and allow it to reboot when the receiver prompts you.
Setup
The receiver will reboot and chances are the screen resolution will be set incorrectly. Press Yellow Button, Then up arrow, then left. That should correct color but if not repeat to correct to NTSC.
The IHUB should be plugged in and the cable connected. You will see a brief message that the module is connected. If it doesn’t appear then turn off the box with the remote and turn it on again. In the Installation menu, IPCONFIG should appear at the bottom. Open this setup and set the following as shown.
Setting Type =DHCP
USE DNS.. Set to YES.
Use the Domain = svftaiks.com
Server port = 1920
Input the serial number in the slot and make sure the numbers are correct. It should be exactly as shown on the device.
Click Apply.
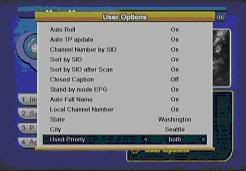
You should be able to test by going to a channel that is not normally available and see if it works. You can also go to the User Options. At the bottom you can select IKS, Card less, or both. If the channel works in IKS but not in card less, you're functional. Obviously those with Nimiq will also guarantee success. When you're sure things are right, set to Both.
Troubleshooting
If you’re reading this then you’re not sure if it’s working or you’re sure it’s not working.
Verify on the website that the service is running first.. Make sure that all connections are correct and you have lights on the hub as well you can see the IPCONFIG menu in the Installation menu. If the IHUB is not connected or resets, the menu item will not appear. If the IHUB resets, it must be reboot to operate again.
Confirm what your system IP is and your router Gateway IP. Don’t confuse any of the PCs in the system or a leaching user as your IHUB. Many routers include software like Network Magic. It won’t see the IHUB. Once you know and can identify which IPs are being used on your system and by whom, make sure the gateway IP is the same for the IHUB as the Gateway for the IHUB. In some cases the IHUB will incorrectly identify the gateway and use an incorrect IP address. This will in turn create an incorrect IP address for the device.
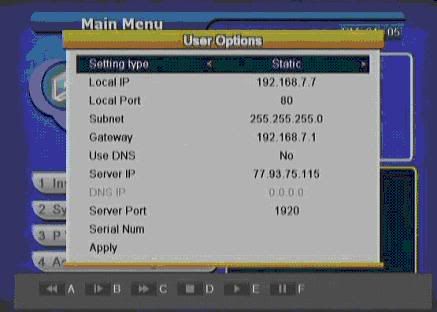
If you find this to be the case then change the DHCP to static and correct the gateway numbers and assign an IP manually to the IHUB.
The Local IP is the IHUB IP number. Make it a number above the last IP in use on your system. Local port is the port your receiver uses so that’s 80. Subnet is 255.255.255.0
For the moment say no. Change the Server IP to 77.93.75.115
DNS IP may show all zeros and that’s fine. The server port is 1920 and will remain the same. Make sure now your serial number is correct and click on apply.
You should check now and make sure things are working. You may want to verify settings are staying in place.
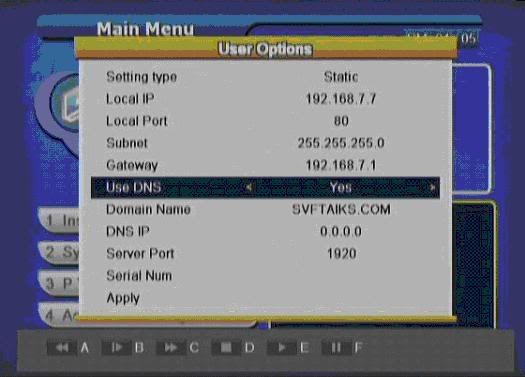
If all is well change the Use DNS to Yes. You now enter SVFTAIKS.COM as the domain name. Click Apply and test again. If that works then again go into setting type and change to DHCP. Click Apply and all should be functioning properly.
For those that have a Motorola modem its possible that the router may conflict with it. In this example shown above the client purchased a Trendnet Router that required the IP numbers to be changed to 7 from 10. If you have had issues with your router in the past this may be the issue your having now as well. Move the router numbers to range to better enhance compatibility.
In this case the original Gateway was 192.168.10.1 used by the router which conflicted with the modem. It was changed to 192.168.7.1 as the gateway and the router and modem worked well together. This change was the cause of his issue as to why the IHUB wouldn’t work as the device couldn’t properly detect the right IP info.
The IHUB easily adapts once working from manual settings to automatic...
Cheers.
Connect the IHUB to the receiver by plugging it in directly to the serial port on the rear of the receiver.
You can either connect the IHUB via the fixed wire to the router and the modem or you can connect a wireless router and change the mode of the router to support wireless reception to the receiver and use a short cable to connect to the IHUB as shown above. The lights on the IHUB should light up if the cable connection to the router is correct. These lights verify connection as well as data transmission.
Software
Download the appropriate software that corresponds to your receiver. You can’t use the device on other machines than the units the software is particularly designed for.
Unzip the file after downloading and copy the file to your USB stick. Remember to properly release the drive from your PC and Windows before unplugging the drive from the computer..
Open the menu and go to your PVR menu. Select the corresponding socket that you plug your USB drive into. The file should appear in the screen as shown below.
Push ok and allow the receiver to load the file. Don’t touch anything and allow it to reboot when the receiver prompts you.
Setup
The receiver will reboot and chances are the screen resolution will be set incorrectly. Press Yellow Button, Then up arrow, then left. That should correct color but if not repeat to correct to NTSC.
The IHUB should be plugged in and the cable connected. You will see a brief message that the module is connected. If it doesn’t appear then turn off the box with the remote and turn it on again. In the Installation menu, IPCONFIG should appear at the bottom. Open this setup and set the following as shown.
Setting Type =DHCP
USE DNS.. Set to YES.
Use the Domain = svftaiks.com
Server port = 1920
Input the serial number in the slot and make sure the numbers are correct. It should be exactly as shown on the device.
Click Apply.
You should be able to test by going to a channel that is not normally available and see if it works. You can also go to the User Options. At the bottom you can select IKS, Card less, or both. If the channel works in IKS but not in card less, you're functional. Obviously those with Nimiq will also guarantee success. When you're sure things are right, set to Both.
Troubleshooting
If you’re reading this then you’re not sure if it’s working or you’re sure it’s not working.
Verify on the website that the service is running first.. Make sure that all connections are correct and you have lights on the hub as well you can see the IPCONFIG menu in the Installation menu. If the IHUB is not connected or resets, the menu item will not appear. If the IHUB resets, it must be reboot to operate again.
Confirm what your system IP is and your router Gateway IP. Don’t confuse any of the PCs in the system or a leaching user as your IHUB. Many routers include software like Network Magic. It won’t see the IHUB. Once you know and can identify which IPs are being used on your system and by whom, make sure the gateway IP is the same for the IHUB as the Gateway for the IHUB. In some cases the IHUB will incorrectly identify the gateway and use an incorrect IP address. This will in turn create an incorrect IP address for the device.
If you find this to be the case then change the DHCP to static and correct the gateway numbers and assign an IP manually to the IHUB.
The Local IP is the IHUB IP number. Make it a number above the last IP in use on your system. Local port is the port your receiver uses so that’s 80. Subnet is 255.255.255.0
For the moment say no. Change the Server IP to 77.93.75.115
DNS IP may show all zeros and that’s fine. The server port is 1920 and will remain the same. Make sure now your serial number is correct and click on apply.
You should check now and make sure things are working. You may want to verify settings are staying in place.
If all is well change the Use DNS to Yes. You now enter SVFTAIKS.COM as the domain name. Click Apply and test again. If that works then again go into setting type and change to DHCP. Click Apply and all should be functioning properly.
For those that have a Motorola modem its possible that the router may conflict with it. In this example shown above the client purchased a Trendnet Router that required the IP numbers to be changed to 7 from 10. If you have had issues with your router in the past this may be the issue your having now as well. Move the router numbers to range to better enhance compatibility.
In this case the original Gateway was 192.168.10.1 used by the router which conflicted with the modem. It was changed to 192.168.7.1 as the gateway and the router and modem worked well together. This change was the cause of his issue as to why the IHUB wouldn’t work as the device couldn’t properly detect the right IP info.
The IHUB easily adapts once working from manual settings to automatic...
Cheers.